Showing posts with label manicure. Show all posts

Saturday, February 8, 2014

Valentines Mani's! Part 1


I decided I wanted to do some Valentines inspired Mani's since I discovered I had so many pinks. So each one is a little different and I wanted to do a different one each day but I started a little late so I am working on getting them all out before Valentines day. Let me know if any of my designs inspire you!

Mani's 1-9 below

Sunday, January 26, 2014

BornPretty store 3 Star/Round/Heart Rhinestones Acrylic UV Nail Glue Clamp Kit

I received the following product in exchange for an honest review. All thoughts are my own.

Another review from BornPretty store. I love that they have so many products at such awesome prices it takes me for ever to pick what I want! I have spent a day on their site before. Everything is so affordable and I know that when I first started nail art cost was a big thing to me and supplies locally are expensive. When I first heard about BornPretty store I fell in love! When they said they wanted to work with us in reviews I was even more ecstatic! Not only do I review from them but I also buy from them and check them first for products that I am hunting for. After looking into details on my ebay I see I actually have been buying from them for years on ebay and let me tell you I have never been disappointed with any products I have gotten from them.

I have been looking to add some bling to my nails and this set is perfect when you are first starting out like me and want a little bit of everything. This set goes for about $8.58 which is amazing with what comes in it.


I had some stars and studs given to me by my friend from IG in an nail mail trade we did and I had been using tweezers with some disastrous results. I couldn't keep a hold of them and dropped them all over the place. In this set It came with these nail art tongs that are fine tipped! I love these things they are amazing! I can pick up a gem and put it where I want it without all the fighting I had to do with the tweezers.

It also comes with these tubes of adhesive which I love the packaging but I am not so skilled at using nail glue. This stuff is strong and when I opened it I accidentally added way too much pressure and got this all over my hands which of course I couldn't just wash it off. I had to ask the old man for help on how to get this off my skin. We ended up using about 5 things to try to get it off and it came down to carb cleaner. Old man says lamp oil will get this off so if you do like I do and make a mess lamp oil would be a good thing to keep around before opening.


The stars are my favorite of course! I have an obsession with them and use them more than anything else.

This is a close up of one of the stars from this set and 2 stars from a wheel I purchased from the site. 

The heart wheel is going to be my best friend in the coming weeks with Valentines day coming up. So look out for some nail art coming your way with studs and hearts.

This mani started with 2 studs but because I used clear coat and not the glue I lost one. Overall I think it looks better with just one.


I really love how these can make a mani so cool. I am going to keep on practicing with these and incorporating them into more and more mani's.

Check out our other reviews from Born Pretty store.

Born Pretty store nail stamping plates # 131


Find them:
Site 
Facebook
Twitter
Pinterest

10% off code LFFW10

Sunday, September 1, 2013

Mani of the day


This mani featured 3 of the sunsational collection from China Glaze (the jelly ones.)

Saturday, July 27, 2013

Mani of the day


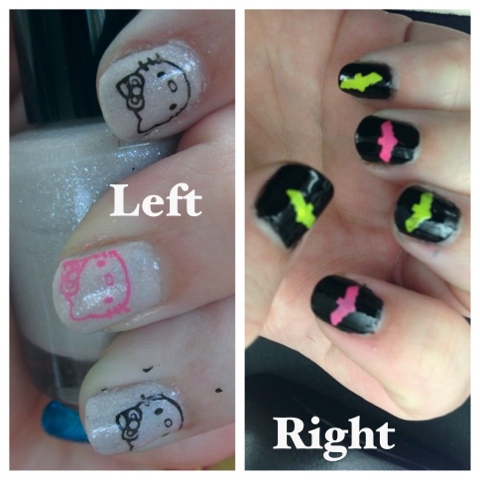
I recently got creative and was playing with my new stamping set and Darling Diva polish from the prince collection and decided to do Hello Kitty. On my right hand I decided to go a little gothy ( I can't seem to do the same design on both hands it seems.) I wore this for about a week and have been swatching since and haven't completed a Mani yet but I plan on doing something tomorrow and will share with you!

What does your mani look like? Link us in your comments.

Tuesday, June 11, 2013

Mani of the day

In light of the popular trend,the skittle manicure, I decided to do one myself on my right hand. I left hand is filled with various polish I'm testing and new techniques. When it comes to my wardrobe there is only a few colors I stick to (black, blue, purple) and I like to be adventurous with my nails to spice it up. In my younger years I wore nothing but black or red like a traditional goth but now I have evolved into more of what could be considered bubblegum goth. So for me this trend Is perfect because it isn't often that all my nails are even close to the same color and I can play with neons while I'm at it. If you want to see the many colors of my polish rainbow check me out on Instagram http://instagram.com/rubyblood where I always post my latest polish find/ polish play time. I am looking at doing these once a week which is about how often I change my nails sometimes more. Hope you enjoy!


Once the sponsored review are complete I will be going through my collection and reviewing them at random. 

Monday, May 13, 2013

Nailtiques Havana and formula 1 nail protein review

Nailtiques Havana and formula 1 nail 
protein review

I received the following product in exchange for an honest review. All thoughts are my own and not influenced by others


Good morning all!!! Hope this post finds you all doing well   I am here to tell you about nailtiques, a company I stumbled upon online who provided me a Sample to test their wares. I am here to tell you I am in love! Havana is a nice deep dark blood red. This is one of my favorite reds I own (which isn't many but the number is growing.) It makes me think of vampires and is a great alternative to black. 

Tuesday, April 23, 2013

Salon Gel Polish Starter Kit

Salon Gel Polish Starter Kit
This product was provided to me in exchange for an honest unbiased review based on ease of use, quality and pricing. All thoughts in this review are my own based on my personal experience with this product.


Sally Hansen has come out with a great product in their Salon Gel Polish Starter Kit!  I love this product, it truly is like getting a manicure at home.  The kit is slightly expensive for $64.99 at Wal-Mart online but its totally worth it once you see the results.  The Kit comes with the first clear coat, gel nail color, and the clear top coat.  It also includes an emery file to shape your natural nails and a cuticle stick to help push back your cuticles if yours are overgrown, acetone polish remover, an LED curing light and ten buffing pads.

I know the price seems pretty high at first but honestly its super easy to apply and lasts for weeks.  I have really thin nails that break all the time and this product also helped keep my nails from breaking.  Now I have seen some online reviews where people did not like this product but when you read their main complaint it is that the polish never dries.  After each coat you'll put your nails under the LED light and cure them and yes, they will be tacky, it is also recommended that the color be applied in two thin coats and to cure after each coat.  Now its finally time for step three.  Apply the top clear coat, and don't worry ladies the bottles are marked 1,2 and 3 so you won't get it wrong I promise.  Cure your nails for thirty seconds for the final time.  The light times out at thirty seconds which is great!  Now, your nails will still be slightly tacky like regular polish that is only half dry.  This is where the buffing pads come in, use them to lightly wipe the extra residue off your nails.  Now when you touch them they are hard as a rock.  I think the persons leaving reviews online where you can purchase the product are not reading or following the directions properly.  The Starter Kit comes in three colors but there are a ton of other colors that can be purchased separately and the process is still the same.  I did try this product with regular nail polish and it did not cure properly and just ended in a mess.  You also have the option to leave out the color all together and just used the bottom and top coat.  This will harden your natural nails and give them a great shine for weeks.  

Now ladies who pick at your nails, follow the instructions in the box for removal and use the acetone remover and wrap your nails in aluminum foil so all of the coats come off at once.  I did try pealing them off and its just like pealing off acrylic nails, your top layer of nail tends to come off with the gel coating so this is a big no no!

If you run out of anything you can purchase refill kits, now you have to use the emery file to shape and then buff your nail and the pads to clean your nails before and after application.  The kit only comes with ten pads so you can use a regular emery file if you need to and the ingredients in the pads are 99% rubbing alcohol.  So if you run out of pads before you need to purchase a refill kit with the bottom and top coat you can use just your basic everyday alcohol pad like the kind you have in your first aid kit.  Or if you're like me I have alcohol pads everywhere for checking my blood sugar and they cost less than a dollar for a box of 100.

You can find more information on this product at sallyhansen.com along with instructional videos and helpful tips and where to purchase. 


These pictures are after two weeks of wear and tear on my nails.  I'm a cuticle picker and nail biter by habit and the product stood up very well.  It also helped curb my biting habit because the nails are so hard.  Now, I'm right handed and this thumb was solid as a rock.  A few days after this was taken, I was at the shooting range trying to load the last round into my six round magazine (no ladies, not the kind you read, the kind you shoot.)  I have a .40 caliber pistol and if you've ever loaded a magazine you know the last one or two are a real bitch to get in because the spring is so tight.  My thumb slipped sideways and the thin edge of the magazine took a chunk right out of the middle of my nail.  Had I not had this Gel Polish on to harden my nail I would have bent my entire nail back and broken it off to the nail bed.  Then I would have had to do the HOLY CRAP I BROKE A NAIL AND IT HURTS dance in front of all the men on the range.  Instead all I had missing was a small chunk in the very middle the width of the side of the magazine.  Let me tell you, that hurt way less and made my nail salvageable once I got home.  If I wasn't already hooked, I am now!

Tuesday, March 26, 2013

Butter London Knees Up Review

Butter London Knees Up Review

I recently got the chance to work with the highly loved brand Butter London. While looking at the colors Knees Up caught my eye, such a lovely red with a metallic sheen.

I have been looking for a red to be a staple in my collection and I believe that this is it! My coworkers even joined in on the fun! Out came the remover, cotton balls, clear coat and we had a blast!


Tuesday, March 19, 2013

Ciate Sequined Manicure Kit in harlequin

Ciate Sequined Manicure Kit in Harlequin

This is the 2nd product I received to review from Ciate. I love the idea of this manicure and unlike most of my co workers I adore glitter. They have 2 color variation available for sale at Sephora currently
  • Harlequin
  • Tutu
These retail for $19 but sometimes go on sale for $13. Inside you will find:
  • Pot of glitter
  • Glitter grip
  • brush


More information about the product:

What it is:

A two-step innovative nail art kit that delivers a raw sequin-like texture.

What it does:

The Sequined Manicure™ was created by Ciaté’s Creative Director Charlotte Knight while styling an extravagant nail look to give an embellished dazzling finish, unachievable by regular nail polish. 


Suggested Usage:

-The kit includes a Glitter Grip polish, the perfect base to create a sequin coat onto the nail. 

-Tidy the nail, sweeping away any excess sequins with your Little Black Brush and finish with a slick coat of Glitter Grip over your sequined nails.

-The finished look is a wonderfully heavy sequin coat, creating an exquisite finish.


My review:

Friday, March 15, 2013

Caviar nails Ciate review

Caviar nails Ciate reviewThere is a new trend that is going on called Caviar manicure or micro beads manicure. If you check online you will find it everywhere. Its even carried by your local Sephora!!! So what is a caviar manicure you ask? Well its where you put these precious pearls on you nail while its still wet thus leaving the nail covered in the pearls, its very eye catching and different.


I got the chance to work with Ciate recently and received the caviar manicure in Headturner. Its a nice turquoise and brass colored pearls.


Caviar nails Ciate review
Web Statistics